How to allow users to upload files for robots to use
Using the RPA.Assistant library, you can add a user interface to your robots. One of the most useful features is the possibility for the user to upload a file, which is then used by the robot in its tasks.
Example: Providing an Excel file with data to fill a form in a web application
When run, the robot will:
- present a form to the user to upload an Excel file
- open a web browser
- log into a web application
- fill a form in the application with the data extracted from the robot file
- save a screenshot and exit
rpaframeworkversion22.0.0or newer is recommended.
rpaframework-assistantversion2.2.2or newer is recommended.
Run this robot as an assistant in Robocorp Assistant
Follow these instructions to upload the robot to Control Room and set up Robocorp Assistant to execute it on your local machine.
Robot script
Robot script explained
This example builds on top of the RobotSpareBin Intranet Robot Complete example, which is extensively explained in our Software Robot Developer Beginners' course, so here we will concentrate only on the RPA.Assistant specific part of the implementation.
Settings
The *** Settings *** section provides short Documentation for the script and imports libraries (Library) that add new keywords for the robot to use. In this case, we will add the RPA.Browser.Selenium library to control the web browser, the RPA.Assistant library to build the UI for the user, and the RPA.Excel.Files to read the uploaded Excel file.
Tasks
Insert the sales data for the week and export it as a PDFis the name of the robot's only task.${excel_file_path}= Collect Excel file from the user: We are creating a variable to hold the path of the file that we collect from the user using theCollect Excel file from the userkeyword.Open the intranet website: You guessed it. It opens the RobotSparebin Industries famous intranet website 🙂.Log inlogs the user in using the unsafely in-code stored credentialsFriendly reminder: you should never use credentials directly in your code. See the Use a vault for secrets page for a better solution.
Fill the form using the data from the Excel file ${excel_file_path}uses the uploaded Excel file to fill forms on the website.Collect the resultstakes a screenshot once the operation is completed.
Keywords
-
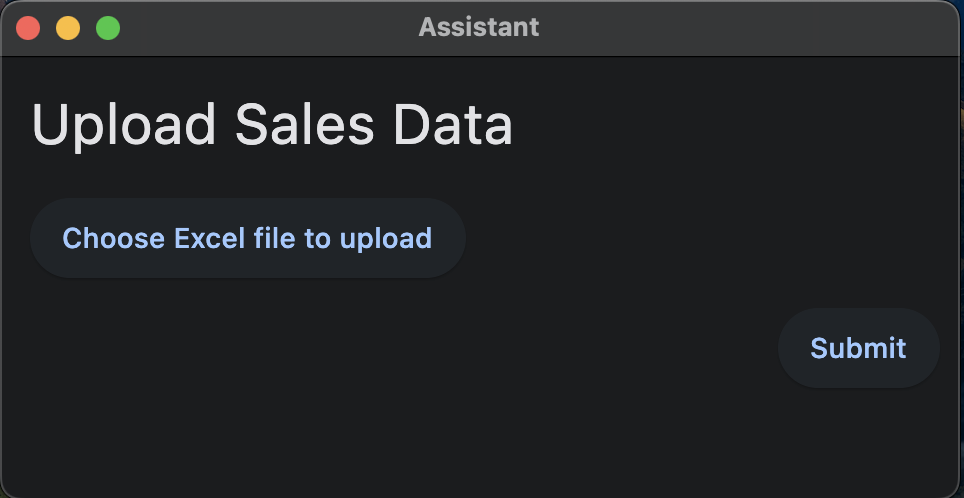
The dialog is created automatically under the hood by the RPA.Assistant library. You can start adding inputs without creating the dialog implicitly.
-
We set a heading for the dialog (
Add heading). -
We add a new file input field to our form (
Add file input) setting the label, the name and the allowed file types that the input should accept. In our case, we will accept only.xlsand.xlsxfiles. -
We add a submit button (
Add submit buttons) to press once the file was correctly selected. -
The
Run dialogkeyword allows us to show the dialog to the user, and to assign the values that the user will enter into the dialog into the result object${response}, which will contain a property with the name that we assigned to our dialog field (fileupload).
The user can potentially upload more than one file to this field at a time. We are, however, interested only in the first one that is uploaded, so we return ${response.fileupload}[0] from our keyword.