Creating a branch
Branching out for added value 🌲
Time for a lame analogy (or a tree-o-logy)!
Think of any tree. Ok, not a palm tree. A tree has roots, a trunk, and a few or many branches (at least three!).
Each new branch potentially adds value to the trunk. They could make the tree three times tree'er than before, providing a resting place for tired birds. Swings can be attached to them. The branches, not the birds.
Not all branches add value. Some are a bit on the ugly side, making the birds select another tree for their recreational purposes. Some snap under the weight of an oversized pigeon (🐓). Some branches might betray the tree and fork a new trunk (that unloyalty is practically tree-son 🥁).
Think of your GitHub repository as a tree, complete with roots (the repository), the trunk (the master branch), and branches (branched off the master branch). You use branches to improve the whole tree, design better resting platforms to support even more, or bigger, birds. After you are happy with your improved design, you can merge your improvements back to the master branch.
"Many communities, both on GitHub and in the wider Git community, are considering renaming the default branch name of their repository from
master. GitHub is gradually renaming the default branch of our own repositories frommastertomain." - https://github.com/github/renaming
Here the master branch is your tree. Currently it supports medium-sized birds:
New branches (support-big-birds, bigger-birds) can be branched off and merged back to the master branch to add value by making the tree stronger:
After the merge, the branches are typically deleted, since they are now part of the (bigger, better, stronger) tree:
Sometimes when working on a branch, you find that the beautiful idea you had did not turn into a valuable extension for the trunk. Perhaps the new branch turned out too heavy for the trunk to support, collapsing the whole tree. Maybe the branch looks like a snake, scaring off all the potential airborne dinosaur descendants. In this case, you might decide to throw the branch (scary-snake-branch) in the trash bin and not merge it back at all! The main branch (master) stays undisturbed by reptilian nightmares.
Being able to iterate on a branch gives you an excellent opportunity to better your design until you feel confident to stick it to the trunk (or toss it to the bin!). It's almost like growing branches in isolation, without disturbing the tree!
In the context of this intranet robot, branches allow you to modify the robot and develop new features for it in isolation until you are ready to merge your changes to the
masterbranch.
Let's branch again, like we did last summer!
Warning! Command-line intensive content ahead. Fear not. We provide suggestions for graphical tools, too! Even if you end up using a graphical Git client in your daily work, it is very useful to have a basic knowledge of using Git on the command-line. We will be using the macOS terminal in the examples.
Creating a local Git branch is a breeze. Open your terminal and navigate to the root of your robot directory:
Note that your Git repository directory names and locations will most likely be different!
List the contents of the directory by running ls -a:
You see a bunch of files. The .git directory is where Git "lives". You can view the files in there if you are interested. Just don't modify or delete them! 😅
Run git status:
Git tells the current branch is master, and that is up-to-date with the remote repository (origin/master) and that there is nothing to commit (changed, added, deleted). Run git branch to see the available branches:
There is only the master branch. The asterisk (*) marks the currently selected branch. Create a new branch by running git checkout -b snake-branch:
Running git branch confirms that there are now two branches: master and snake-branch. The asterisk (*) marks the currently selected branch:
Great! We are now on a new branch (snake-branch). It is identical to master branch, since we have not added, edited, or deleted anything. It is like a carbon-copy of the master branch. We can mess around in the snake-branch as much as we want without affecting anything in the master branch!
Creating a new file 🐍
To get a feel of how branches work, let's add a snake (!). Create a new snake.txt file containing "Hiss!". If you are on macOS, run the following in the terminal to create the file (you can also create the file with your favorite text editor!):
Viewing the branch status
Running git status shows that Git has detected a new file:
Adding the file (staging)
Run git add snake.txt to tell Git to track the file. It's like saying: "I care about this file. Keep an eye on it!":
If you have multiple directories and files to add, you can add all of them by running
git add .. It works if you have just one file, too! Use the name of the file when you want to add only a subset of available files.
Run git status to verify Git is tracking the new file:
The snake.txt file is staged, but not committed yet. You are telling Git: "I'm pretty sure I'm going to keep this one..."
Committing the file
To commit the file, run git commit -m 'Add a snake' (you are telling Git: "Yep, store this for me, thanks!"):
Running git status tells everything is committed:
Comparing the branches
Compare the snake-branch with the master branch by running git diff master:
Git tells it found one difference; the added snake.txt file. The branches are not identical anymore. The snake-branch is otherwise the same as the master branch, but it contains some additions that are not in the master branch.
If the snake.txt was a new feature for your robot, the new feature would not disturb the master branch. If you decided that your addition is excellent, you could merge the snake-branch to master branch. Then the master branch would contain all the changes you did in the snake-branch!
This is all great, but I'm a tad allergic to the command-line! 😊
Do real developers use only the command-line? No. Some prefer command-line tools. Others prefer more visual tools. For Git, you have plenty of graphical clients available. Here's how the diff (comparison) looks when viewed in Visual Studio Code, using the GitLens extension:
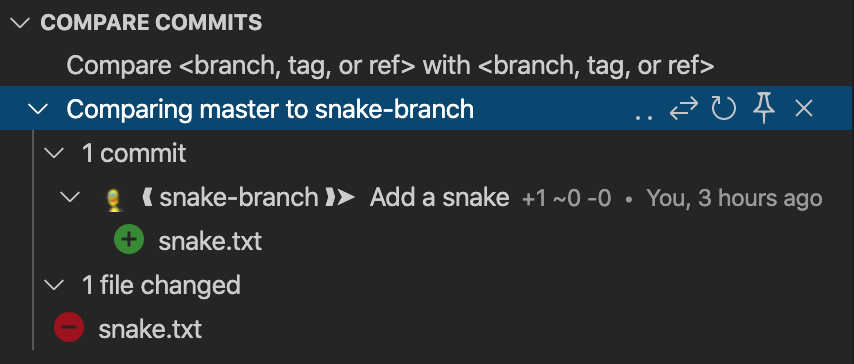
Or in GitHub Desktop:
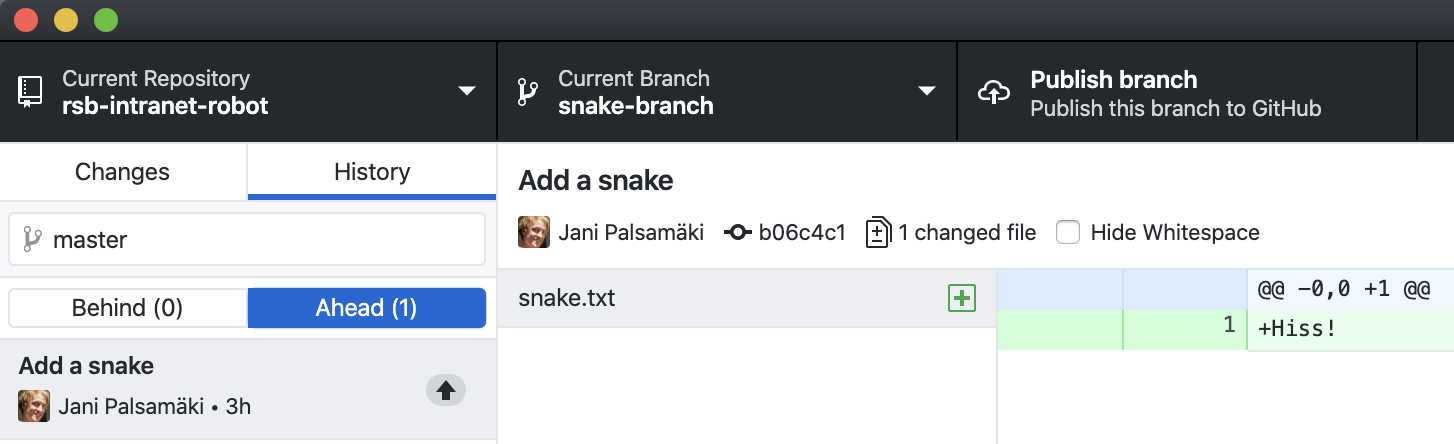
Other graphical Git clients are available, too. You could use Fork, or Sourcetree, for example. Pick your poison! 🧪
Maybe this snake was not the best idea. How do I get rid of it?
You decide that this new branch does not really help to make the robot bigger, faster, and stronger. How to get rid of it?
One thing to note is that the
snake-branchexists only on your computer. To publish the branch to GitHub, you would push the branch to the remote repository (git push -u origin snake-branch, or clicking in your graphical Git client). Since you have not pushed anything, the poor to-be-gone branch exists only on your computer.
To remove the branch, you first need to checkout some other branch (you can not delete a branch you are currently on; you would just fall from the tree!). Checkout the master branch by running git checkout master:
Delete the snake-branch by running git branch -d snake-branch:
As you can see, Git wants to make sure you don't accidentally delete stuff. "Not fully merged" means that the changes you have made in this branch have not been merged to any other branch (such as master). This means that if you delete the branch, the changes are gone. Poof! 💥
Since you are sure you want to delete the branch, you run git branch -D snake-branch:
Getting to the beef!
Enough theory and practice. Time to get our hands dirty! The first thing is to move the credentials away from the codebase. Having the username and the password committed in the repository is not a best practice!
Start by creating a branch. Make sure you are currently on the master branch by running git status:
Create a new branch by running git checkout -b remove-credentials:
Great! Now you are ready to safely start hacking away without messing up the master branch. 🎸
What we learned
- Branches allow you to develop your robot in isolation without disturbing the production robot.
- You can use Git on the command-line, or with a visual client.
- Git tracks your changes and makes it possible to compare them between branches.
- Many projects use the
masterbranch as the production branch. - Development branches (also known as feature branches) are branched off the
masterbranch. - Development branches can be merged back to the
masterbranch when they are "done".