Setup for Windows Desktop automation
Overview
Running automation that requires interaction with the Windows desktop requires an active user session to Windows.
The primary limitations that the Worker solution needs to handle are:
- Restart correctly over system reboots
- Robots are executed inside the specified user's session with the permissions, limitations, and applications available to that user
- Each installation is bound to a specific workspace in Control Room to avoid accidental executions on wrong Workers
- Credentials related to the user account are only stored on the machine in Windows Credential Manager and Windows Services configuration
- Multiple Workers with different user accounts can be added on the same machine.
- No requirement to keep user sessions logged in outside robot executions.
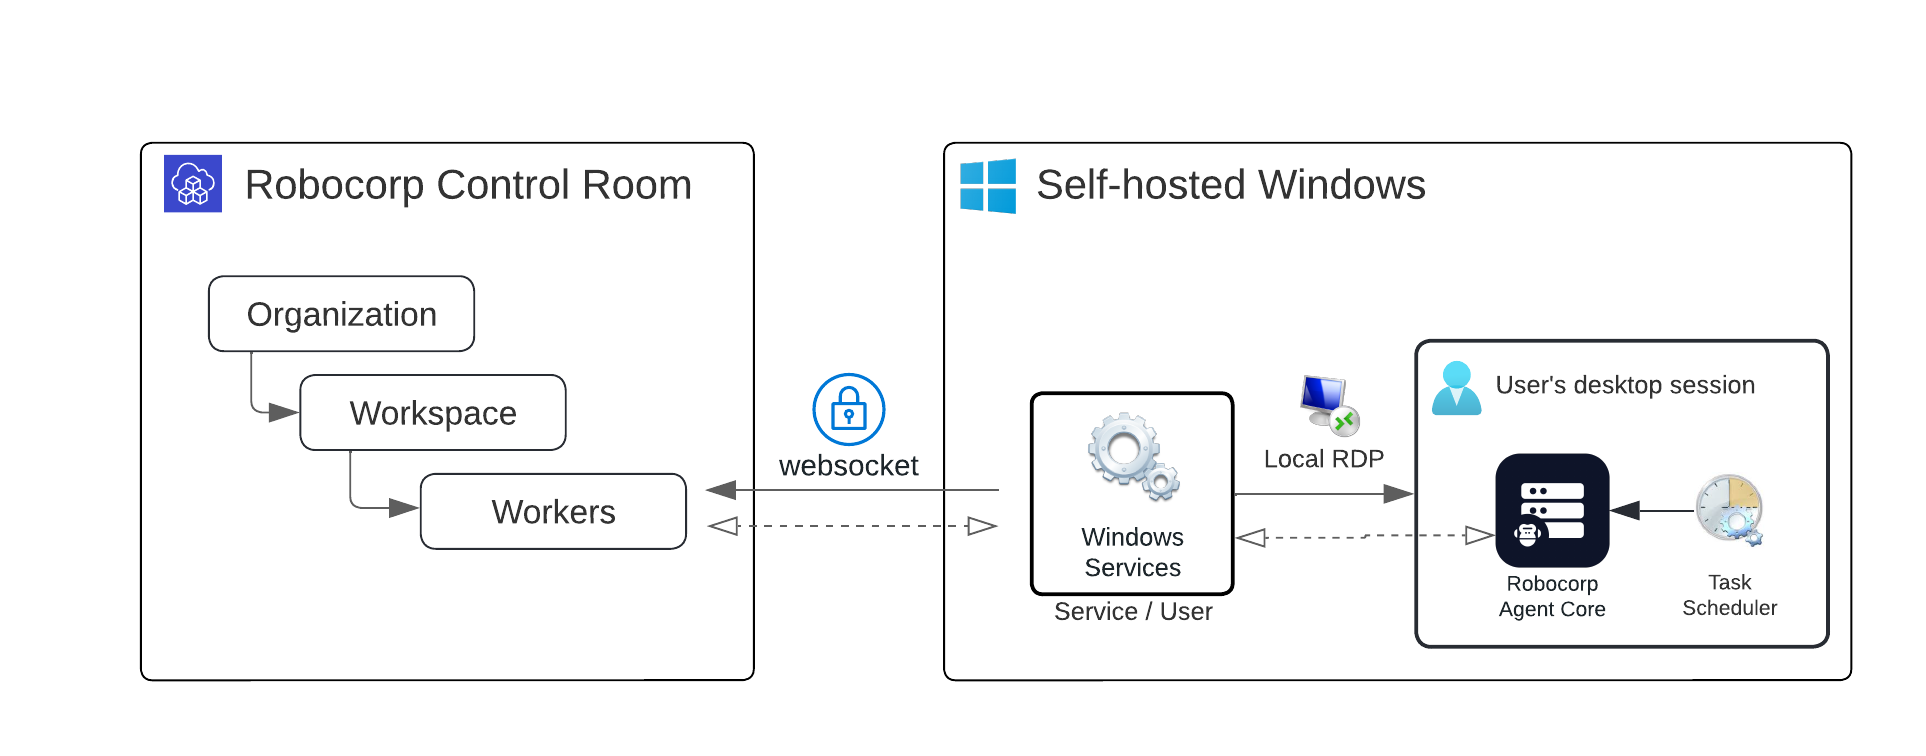
The main parts of the solution are:
- A Windows Service per Worker
- Provides a secure connection to Robocorp Control Room to trigger robot executions.
- Handles restarts after reboots
- The service opens a Remote Desktop connection inside the localhost machine
- This opens the user session and desktop so the robot can interact with the complete Windows UI.
- A Task Scheduler job
- Used to launch a
Workforce Agent Core-instance inside the user session - The launched
Workforce Agent Core-instance is the one that executes the robot and communicates with Control Room via the Service.
- Used to launch a
Setup using Setup Utility
Robocorp Setup Utility has been made to simplify the setup and management of Windows Desktop Workers.
👉 If you are not IT and/or you do not need to do the setups with CLI or scripting, use Setup Utility.
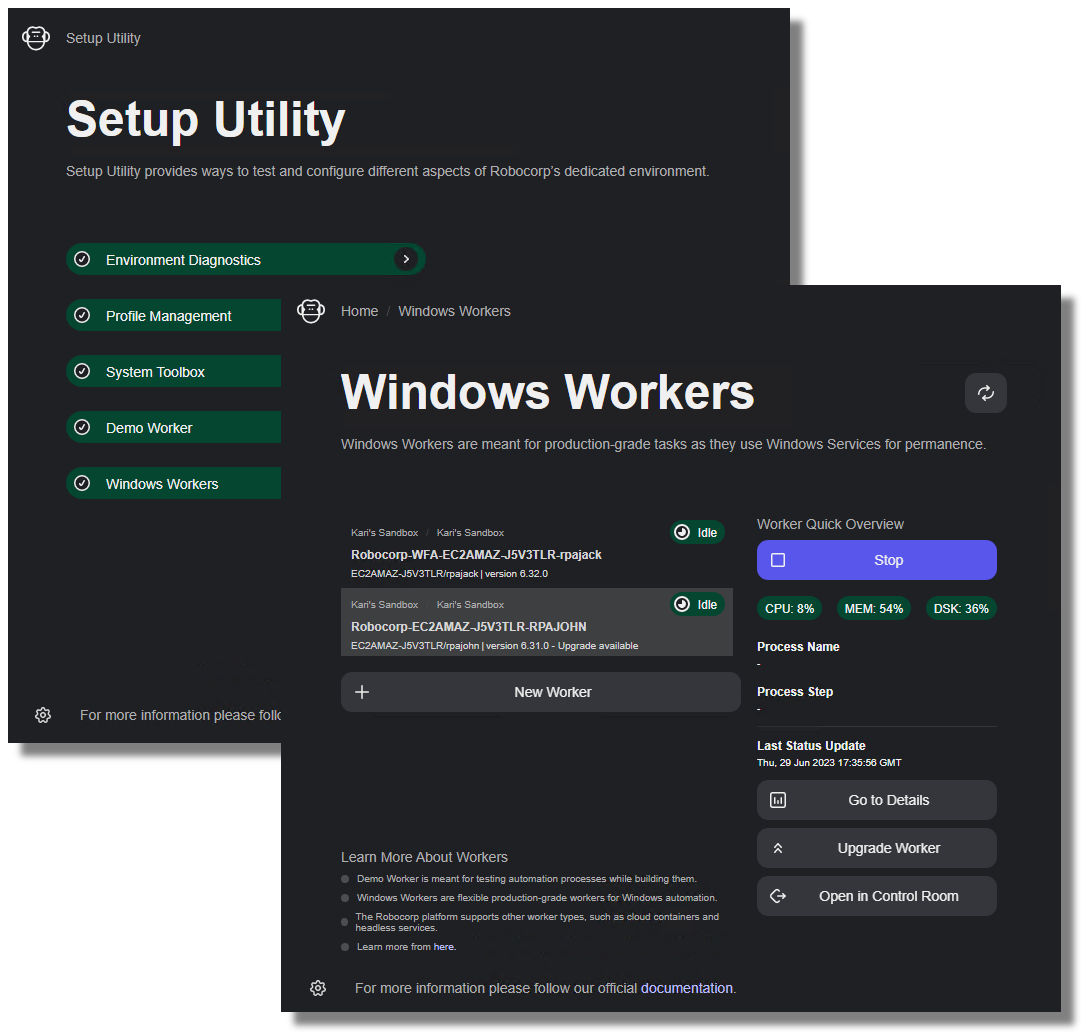
With Setup Utility, you can log in to your Windows machine as an admin user and then set up Workers for other bot user accounts.
With Setup Utility, the target user account does not need admin-level permissions during installation.
You do need to check out the Prerequisites, and do not forget that this page contains the Troubleshooting -section to cover some of the more tricky enterprise level corner cases.
🚀 Find the detailed guide in Setup Utility User Guide
Setup using command line
The following setup guide is the most straightforward and works for 80% of the cases, referring to a specific Star Wars series: "This is the way".
The remaining 20% have some variance of company policies, in which case you can check out the prerequisites.
To keep things clear the write-ups on technical guides, advanced tooling and troubleshooting are all separated later in this article.
The setup does require elevated rights, so this is simplest to do with access to administrator permissions. The user accounts that are running the service do not need administrator permissions.
🚀 Let's get started; the steps are:
- Add / select the user
- Setup the service
- Test the service
1. Add / select the user
The first thing we need is the user account that we want to run the robots.
If you know and have the details of an existing user, you can open a Remote Desktop connection to the target machine with that user.
You can find more details about our recommendations for the user accounts
If you are using local user accounts, you need to do a few extra steps:
- Add the user according to How to add local users on Windows
- Add that user to the
Remote Desktop Users-group so it can open the connections.
🚀 Now open a remote desktop connection to the target machine with the user defined above.
2. Setup the service
- Create a common folder on the target machine in a location that all users can access.
- For example:
C:\temp\robocorp - This simplifies things, especially in case you are targeting to set up multiple users.
- For example:
- Download the
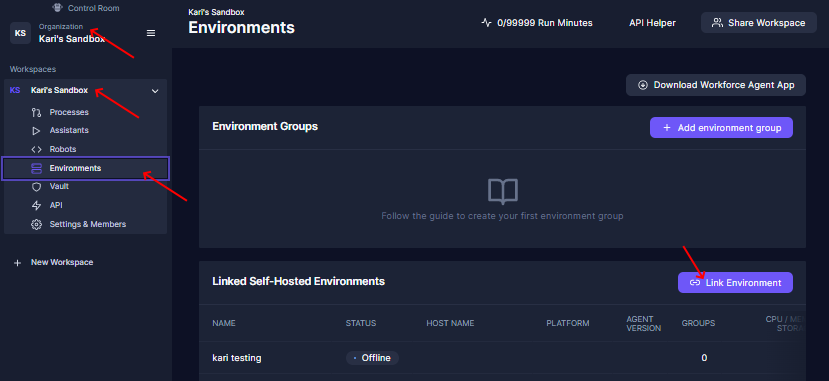
Robocorp Service Helper-tool into the common folder - Log in to Control Room, navigate to the correct
Organization > Workspace > Workers- Create a link token in Control Room and store it temporarily in the common location in a simple text file
- These tokens are valid only for one hour and are single-use, so it is only a secret for the setup phase; no need to store them anywhere.
- Open the command prompt as administrator and go to the common folder
- Open Start menu > type cmd > right-click >
Run as administrator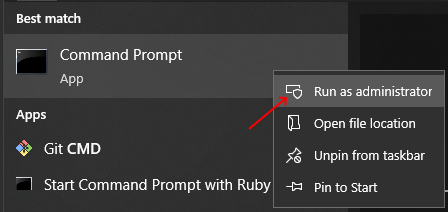
- Open Start menu > type cmd > right-click >
- Run command:
robocorp-service-helper setup-desktop- You will be asked to verify the user's domain; if the one shown is correct, just press enter
- You will be asked to verify the username; if the one shown is correct, just press enter
- You will be asked for the Control Room Link token; paste the token in and press enter
- Service Helper will now setup everything:
- It creates the Windows Service, the task scheduler job, and loads
Workforce Agent Corefor the user account. - The worker is then added and linked to Control Room.
- The worker in Control Room, the service, and the task schedule are all named with the same naming convention to help identification:
Robocorp-WFA-<machine name>-<domain>-<username>
- It creates the Windows Service, the task scheduler job, and loads
- After the setup, you need to set the users password in two locations
- This is done to prevent any external tool (including Robocorp's) from accessing your user's password.
- Set the password to Windows Credentials Manager
- Set the password for the Windows Service
- You can now start the service
- Run command:
robocorp-service-helper start - Or start the service via the
Windows Services-application.
- Run command:
- The worker should now be visible in Control Room in the
Idle-state.
🚀 Setup is now done, and you can sign out of the machine.
3. Test the setup
The best way to test the setup end-to-end is to run a simple RDP test process in Control Room to verify if things are working.
- In Robocorp Control Room, go to the organization and workspace where you just added the worker
- Add a new robot; we recommend using our
RDP test-robot:- The robot codes are in the open-source GitHub repository
- You can download the robot zip file and add it as Robot File to Control Room.
- Now add a process that uses the robot
- Select the worker just created
- Enable the
Use Desktop Connectionin the advanced step configuration.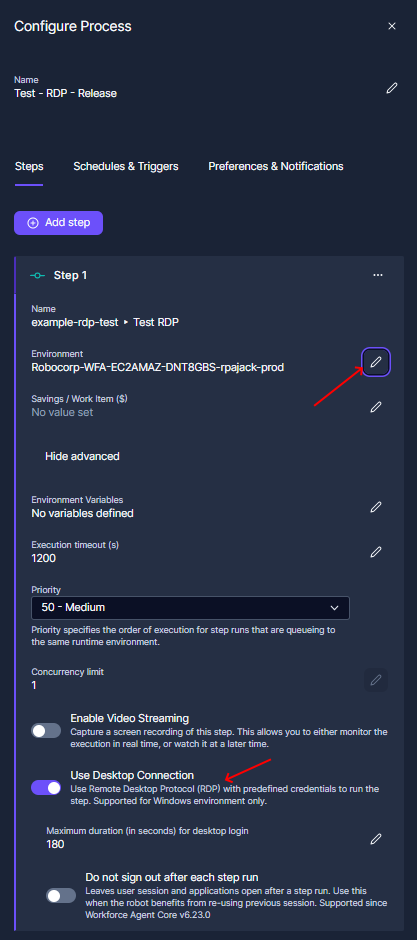
- Run the process
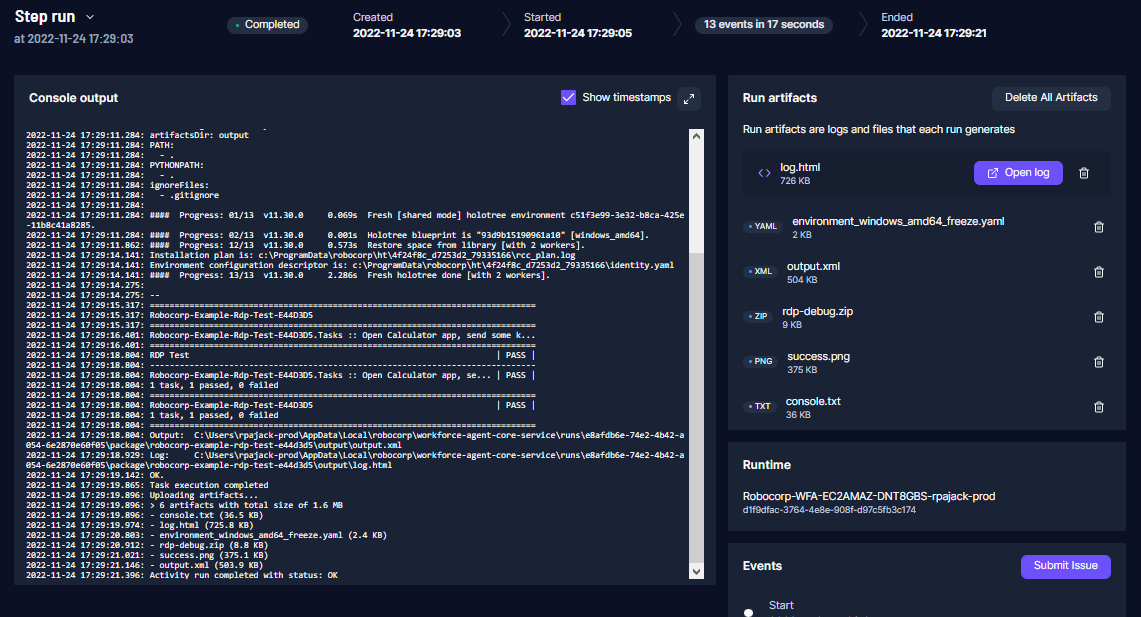
🚀 If the process passes, you should see a screenshot of the calculator in the step artifacts 🚀 You are now done and can start setting up Control Room processes to us the new worker
If the test fails, you will get process step artifact logs and screenshots to help figure out the next steps.
The most common cases for failures:
- Typo in the password inputs
- The user or the user group is blocked from remote connections
- The domain name is not detected correctly in some AD setups.
- The amount of RDP connections is limited by policy or by RDS licenses
- When opening the remote desktop connection, some pop-ups require user input.
More details and help in prerequisites -chapter.
Prerequisites
We have seen different enterprises having varied ways of setting up Windows Group Policies, Active Directories, etc., so any feedback on the guides and tools is highly appreciated.
Some settings are highly specific to company-level IT practices, so we are collecting the findings here.
Do not hesitate to contact us in the Robocorp Slack.
Verify that the RDP connection is not blocked
The solution does NOT take any RDP connections from external networks. Still, it requires opening an RDP session locally on the machine without any confirmation pop-ups or user interactions.
The list below is a collection of settings we have seen blocking the setup:
- Windows Remote Desktop enabled on the target machine.
- The RDP session is only opened inside the target machine (localhost) and does not need to be open to external connections.
- The connections are made from
TERMSRV/127.0.0.2using the default RDP port3389
- The target machine cannot have Windows Interactive Logon messages enabled.
- These usually come in the form of legal notices and cannot be bypassed by automation as they are designed to require human input.
- Disabling this has to be done with the permission of the IT controlling the target machine.
- See the technical guide: Group Policy: Disable Interactive Logon
- Group Policies can allow/block specific user groups from opening local RDP connections
- See the technical guide: Group Policy: Allow local RDP connections for user groups
- Check your currently active group policies by running the command:
rsop.msc
- Running more than two simultaneous user sessions on Windows Servers requires Microsoft RDS CAL licensing, read more behind the link.
- Company policy running scripting that clears out Task Schedulers that are not white-listed
- This will wipe out the task scheduler job that triggers the executions.
- If you are aiming to setup multiple executors on a single machine, you need to check Group Policy: Limit number of connections
You can test the connection as you are making the settings.
Users for running the automation
- Add or select the user(s) on the target machine you want this setup to use.
- You can use the user(s) to limit the machine's access.
- The user can be a local user or from AD; you need to know the user's domain.
- You need to know the user's password when setting up the service.
- The user will be added to the group
Remote Desktop Usersunless they are already there by the helper tool. - If you are aiming to setup multiple executors on a single machine, you must set up a separate user account per service.
- In these cases, the separation by user accounts is mandatory to avoid file system collisions.
- It is also highly recommended not to use any existing human-user accounts.
- Having humans using these user accounts should only happen for setting up and possibly debugging situations.
- Creating a clearly separated user account for automation execution also enables clearer control over the permissions these accounts need and have.
- Our recommendation is to set these accounts up with really complex passwords, as having machines like these submitted to frequent password changes only means more people need to know the passwords and therefore have access to the systems where those passwords are stored.
- Updates to the services can be done via other human administrator accounts, so after the setup, the need to log in as these users should not be frequent.
Azure Active Directory (AAD)-users cannot be used to run Windows services- The user for the RDP setup needs to be either a local user or from a regular Active Directory.
- Despite its name Azure Active Directory has very little in common with the regular Active Directory regarding functionalities; check out a summary of the differences here.
- For these users, it is highly recommended to avoid spaces and special characters usernames
- Spaces and special characters can cause many problems for Python implementations.
- Troubleshooting Guide
Technical guides
The simple setup gives the most straightforward way to get started.
The technical guide chapters explain the more extensive feature and ways of using the tools and essential update and maintenance actions.
Update
The Workforce Agent Core -application is getting regular updates and new features, so maintenance of the service needs to have a known cadence for updates. We consider having at least a 6-month cycle as the minimum, but we recommend having a monthly cadence around service updates. The changelog always shows the changes made.
We follow semantic versioning, which means only the major version updates can introduce breaking changes to the functionality. Minor and patch releases can only add or fix functionalities.
Updating the Workforce Agent running in the service requires three actions in Robocorp Service Helper
Verify from Robocorp Control Room that no automation is running or is about to start. Stopping the service will make the worker offline for the duration of the update. The update itself should only take under a minute as it only downloads the new executable,
- Stop the service
- Interactive:
robocorp-service-helper stop - With config file:
robocorp-service-helper stop -c <config file>
- Interactive:
- Update the Workforce Agent Core
- Interactive:
robocorp-service-helper update - With config file:
robocorp-service-helper update -c <config file>
- Interactive:
- Restart the service
- Interactive:
robocorp-service-helper start - With config file:
robocorp-service-helper start -c <config file>
- Interactive:
You should see the worker in Idle -state in Control Room.
Uninstall / Reset
If you need to remove the setup or want a clean start, the guide below helps you out.
Note: The uninstall sequence cannot, at the moment, remove the worker from Control Room, so it is good to identify the worker there so you can remove the correct worker once you have uninstalled the services.
- Get Robocorp Service Helper -tool to the target machine
- Stop the service with the command:
robocorp-service-helper stop
- You can then remove the service with the command:
robocorp-service-helper remove --all
After this, you can check the three places where the service is visible:
Windows Services: The service with the given name should no longer be listed.Task Scheduler > Task Scheduler LibrarySchedule starting with the given service name should no longer be listed.Credential Manager > Windows Credentials > TERMSRV/127.0.0.2: Should no longer be listed.
Set the password for the service
To the set the password for the Windows Service:
- Open Windows Services > Find & open
Robocorp Workforce Agentproperties > Log on- The username is set, so you only need to input the user password here and Apply changes.
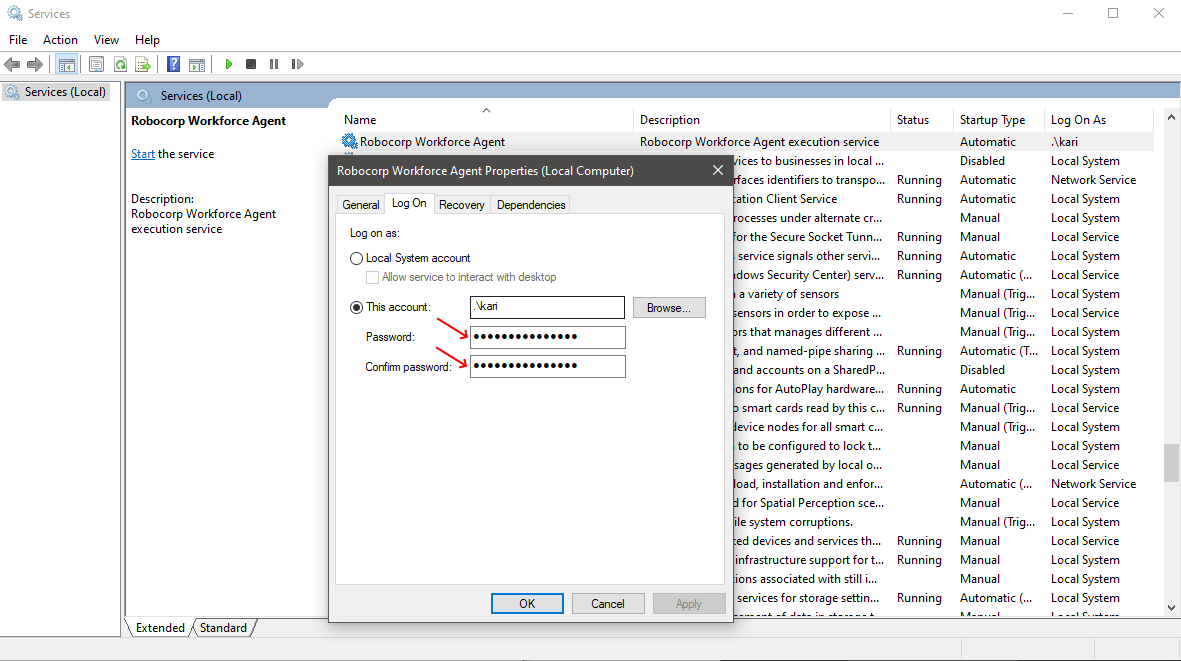
- The username is set, so you only need to input the user password here and Apply changes.
You can only start the service if you give the correct password in the setup phase.
If you left the password empty or had a typo, you can set the password here.
Set the password to Windows Credentials Manager
The user's access credentials are stored in the machine's Credential Manager for the local RDP connection.
- Setup the RDP user and password to Windows Credential Manager:
- Open Credential Manager by typing
credential managerin the Start menu - Select
Windows Credentials - Edit the credential:
TERMSRV/127.0.0.2by setting the users password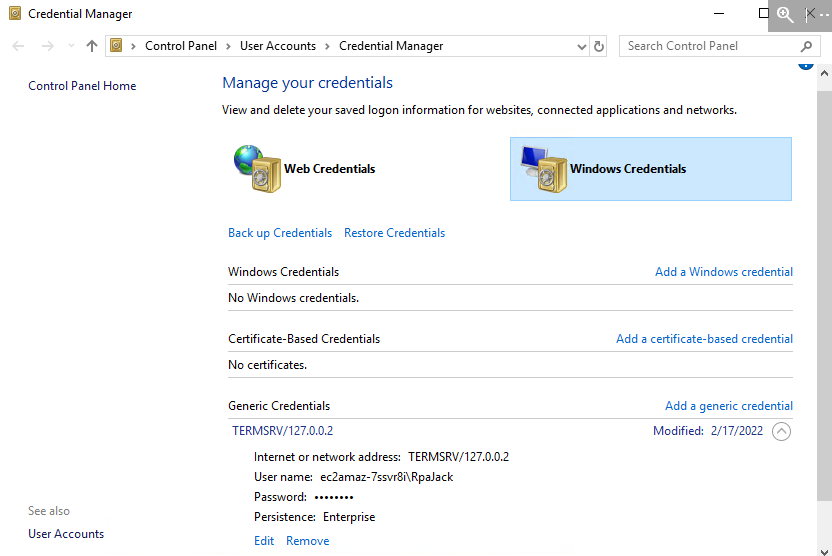
- Open Credential Manager by typing
Multiple Workers on a single machine
Suppose your automation only uses applications and files specific to the Windows user. In that case, there is no reason why multiple robots could not be running simultaneously on the same machine.
👉 Reduces the setup and maintenance cost of separate Windows machines (virtual or physical).
👉 Enables parallel running with Worker Groups, and you can fully use the machine's resources.
👉 The setup of the service itself is always the same; it is done separately per user account.
Hardware considerations
- The machines need to allow multiple simultaneous connections.
- Running more than two simultaneous user sessions on Windows Servers requires Microsoft RDS CAL licensing
- Each user on a Windows machine needs at least two CPU cores
- One for running the system, virus scanners, etc.
- One for actually doing things
- Each user session also needs memory
- Opening Chrome to google.com takes a good 400MB of memory
- Hard disk speed is a big factor in RPA
- There are usually a lot of file actions
- Hard disk is a shared resource between users
- SSD is a good 10x-30x faster than a spinning disk
- Virus scanners are good to have but will slow down file systems by a factor of 2x-5x
- Even a fast SSD behind virtualization layers can end up being slow
- Disk space should not be an issue these days, but it depends a lot of the automations
- For reference, our single user general minimum system requirements.
- To test the machine out, we have the command
rcc config speedtestin RCC- This tests the disk, network connection, and CPU capabilities by building a known Python environment.
- In the result, numbers negative is bad, and positive is good.
- For reference, a good result:
Score for network=87, filesystem=60, and time=44 with 11 workers on "windows_amd64".
Software considerations
- The applications targeted for automation must also support multiple users on the same machine
- Two robots trying to use the same file, for example:
C:\temp\my-temp.txt, will fail due to file locking- Robots must be aware when using the machine's common resources and try to work inside user folders.
- Memory usage is of course, totally dependent on the target applications, so good to keep track of this.
Leverage Worker Groups
In this use case using Worker Groups -feature in Control Room becomes really powerful.
For robot runs, using Worker Groups enables parallel executions and redundancy.
For the setup phase, you can define an Worker Group first and create a Group token with an expiration time.
This link token can be reused to link multiple Workers, and Workers are automatically added to the correct group.
Remember to keep the link token expiration time reasonable with security in mind, though.
Microsoft RDS CAL licensing
Let's open up the acronyms first:
- Microsoft Remote Desktop Services (RDS)
- Client Access License (CAL)
The full details and documentation at Microsoft's documentation
For companies already using multi-user Windows VMs, this is "business as usual". You may only need to request to your IT (or who is managing the RDS server) that you need an RDS license for machine A for user accounts X, Y, and Z.
There are many ways to buy and manage RDS licenses, so it is tough for us to give a definitive guide on how to do the setup.
The main steps are pretty simple:
- Setup the RDS provides service on a new or existing server (preferably Windows Server 2022)
- Buy an RDS license and add it to the service
- We recommend
User CAL-licenses as they are much simpler to manage, and you will probably use the same users on multiple machines.
- We recommend
- Configure your machines to use the RDS server for licenses
- Windows Group Policy editor:
Computer Configuration └─ Administrative Templates └─ Windows Components └─ Remote Desktop Services └─ Remote Desktop Session Host └─ Licensing
- Set:
Use the specified Remote Desktop license servers - Set:
Set the Remote Desktop licensing model
- Windows Group Policy editor:
For the Workforce Agent RDP solution, this limitation can be seen when you try to open a third user session on one machine. The machine will prompt: "Two users are already logged in". This prompt will block the Workforce Agent from opening the connection, and it will time out.
RDS CAL Pricing
It is good to clarify the license types because even the Microsoft documentation is somewhat hard to find on the difference between per user and per device licenses:
- User CAL
- With the User CAL, you purchase a CAL for every user who accesses the server to use services such as file storage or printing, regardless of the number of devices they use for the access.
- Device CAL
- With a Device CAL, you purchase a CAL for every device that accesses your server, regardless of the number of users who use that device to access the server.
08/2022, we bought licenses directly from Microsoft's site as consumer users.

Both the 1 User CAL and 1 Device CAL cost $220, but what the RDS license manager shows is quite confusing as you see many more licenses than what you buy.
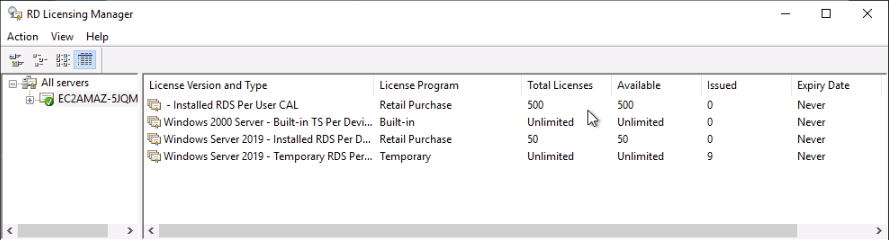
After some heavy digging, we determined that what the server shows and what you have are two very different things, and essentially if audited, you should have the correct amount of licenses.
There are a lot of 3rd party vendors selling the RDS licenses at ridiculous prices, so it is good to verify the situation directly from Microsoft's pages.
Advanced tooling
The simple setup gives the most straightforward way to get started. That sequence shows the interactive mode of the Robocorp Service Helper -tool, where the tool determines values it can determine and confirms them with user prompts.
The chapters below highlight a few more advanced key features of the tooling.
Robocorp Service Helper
The base tool for all setups in this article is the Robocorp Service Helper -tool. The tool is a relatively simple CLI tool that enables all actions to be scripted.
robocorp-service-helper --help is a valuable command.
We only deploy one version of the tool, so when you download, you will always get the latest version.
- https://downloads.robocorp.com/service-helper/releases/latest/robocorp-service-helper.exe
- Using curl:
curl -o robocorp-service-helper.exe https://downloads.robocorp.com/service-helper/releases/latest/robocorp-service-helper.exe
You can check the version with: robocorp-service-helper -v
Robocorp Service Helper command line arguments and config files
Giving all the parameters for the helper tool enables you to script whole setups so that there are no user interactions. This is especially valuable for IT -department style usage when working with fleet management tools that are used to set things up.
The command line arguments are best documented with the tool:robocorp-service-helper --help
You can get command specific helps by just extending the command:robocorp-service-helper setup-desktop --help
Example:
Using config files is just an extension of this where you are just storing the command-line arguments in a config -file, and instead of ten arguments, your helper command has a pointer to the config file. The config file is a valuable tool for smaller-scale setups, where things are done manually and get repetitive.
Essentially the config file fields match the command line arguments, and the config file is just a YAML file, so any text editor will do:
Remote desktop configuration file
The setup creates a local config file that can be used to control how the local RDP connection behaves.
You can find the config.rdp file under %localappdata%\robocorp\workforce-agent-core-service or in the location where you directed the setup.
Note:
In basic cases, you do not need to do anything here, and we have plans the enable this control directly from Control Room.
Currently, the only known cases for needing this have been custom RDP port settings and desktop resolution control.
By default, the file content looks like this:
The official Microsoft documentation
Controlling the resolution of the desktop connection
You can just add the following lines to the config file to the end of the config file to get the resolution you want:
Troubleshooting
Figuring out the correct domain for an AD user
In some cases, the user domain for an Active Directory can be misinterpreted by our helper tool. We have yet to find a bullet-proof way of knowing when this happens and how we could detect this correctly.
Using the command: whoami, in some cases, has revealed the correct domain name.
Group Policy: Add Group Policy: Allow local RDP connections for user groups
Goal: Avoid Group Policy blocking the local connection completely
- Open
Group Policy Editorand navigate to:Computer Configuration └─ Windows Settings └─ Security Settings └─ Local Policies └─ User Rights Assignment └─ Allow log on through Remote Desktop Services - By default,
Remote Desktop Usersshould be listed here.- If you are using different user groups, list the correct one here.
Group Policy: Limit number of connections
Goal: Allow multiple remote connections from different users at the same time
-
Set the amount of allowed RDP connections on the machine to match your needs:
-
Windows Group Policy editor:
Computer Configuration └─ Administrative Templates └─ Windows Components └─ Remote Desktop Services └─ Remote Desktop Session Host └─ Connections- Open and enable
Limit number of connectionsand set the number of connections to 100 so that you will never hit this limit.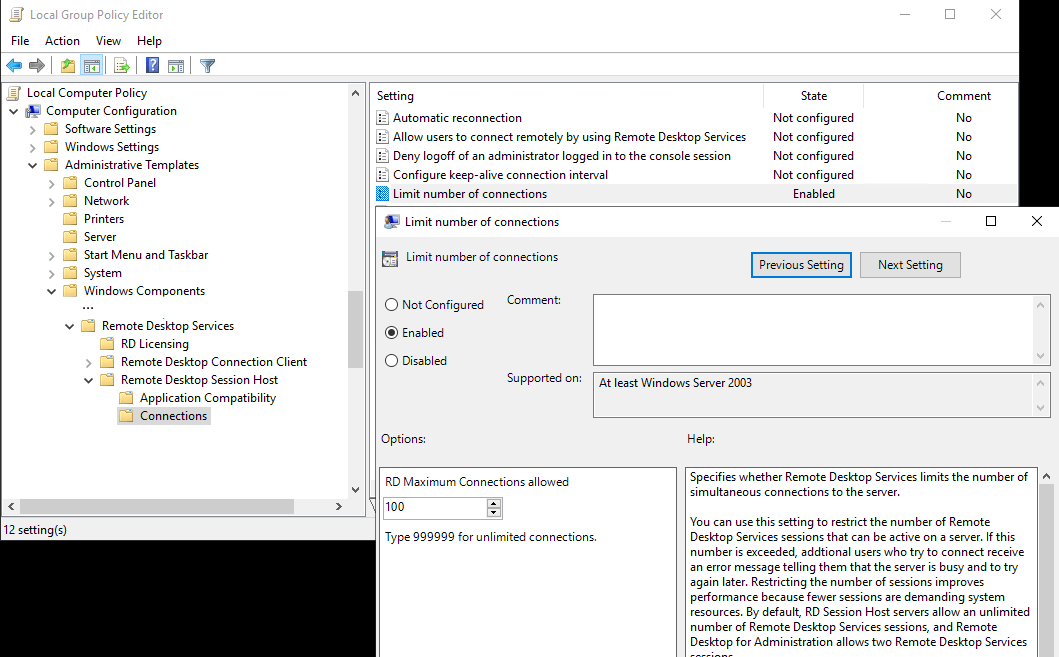
- Open and enable
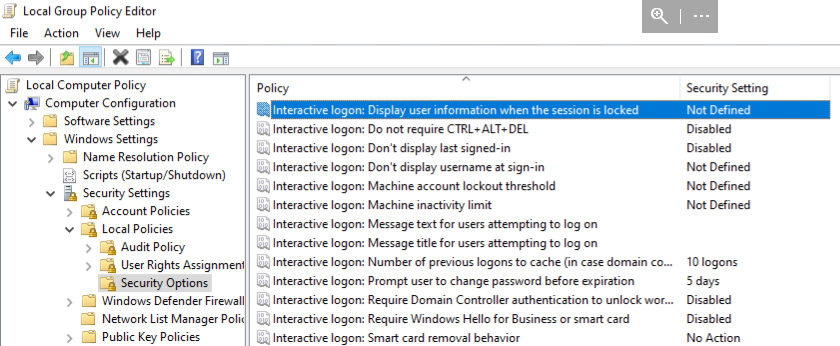
Group Policy: Disable Interactive logon
Goal: Disable the Windows Interactive Logon messages, so that the automation user is able to login.
- Windows Group Policy editor:
Computer Configuration └─ Windows Settings └─ Security Settings └─ Security Options └─ Interactice logon: ...
- There are multiple settings to control the interactive logon, but the key thing is to disable this only for the users that need to run automations.
- There are multiple settings to control the interactive logon, but the key thing is to disable this only for the users that need to run automations.
Testing the desktop access
For most of the prerequisite -cases, you can test by just opening a Remote Desktop connection to the target machine. You should not see any extra pop-ups that require user input to click away.
Setting up a test process in Control Room is the best end-to-end test to perform as it is the "real deal".
Hint: The test process defined above is also a good early-warning process, so if you run that scheduled and set up notifications for this process, you can get notifications for bigger external problems with the target systems blocking executions.
If you want to verify the desktop access functionality locally from inside the user session, follow the guide below:
- Log into the target machine with the user that is running the service
- Test the connection with the command below:
- Note: If successful, this will kick you out of the remote desktop connection you are using.
- The command to run is:
robocorp-service-helper test-desktop
- If you get any pop-ups that require user input, further actions are needed.
- Check if the technical guides for solution
- Please get in touch with Robocorp on these cases so that we can keep improving this guide.
- If you were kicked out of your remote connection, everything should be working, and you can start assigning work from Control Room.
Check the actual Group Policies that are active
With the Windows Group Policy -editor, it is easy to get confused about the actual effective policies for the machine.
The editor shows all the values and the values you have potentially edited, but if your company IT controls Group Policies, it is easy to miss those.
The command to check the active group policies is: rsop.msc.
The resulting view is similar to the Group Policy editor, but the list only contains values that have been set, which makes the list quite a lot simpler to filter through.